
When it comes to constructing or renovating a roof, one of the most critical components is often hidden beneath the surface—the roof underlayment. Acting as a secondary layer of protection between the roof deck and the roofing material (such as shingles or tiles), the roof underlayment is essential for ensuring the longevity and durability of your roof.
In this guide, we'll cover everything you need to know about Roof Underlayment Installation, including its importance, types, and installation process, along with best practices to ensure a leak-free and long-lasting roof.
What is Roof Underlayment?
Roof underlayment is a protective barrier installed directly on the roof deck, under the main roofing material. It serves as the first line of defense against water, snow, and wind-driven rain, and is crucial in preventing leaks that can damage the home’s interior.
Underlayment comes in a variety of materials, each suited for different types of roofing and climate conditions. The choice of underlayment can greatly impact the overall performance of your roofing system, making it an important decision for any homeowner or contractor.
Why is Roof Underlayment Important?
Roof underlayment provides essential protection by:
-
Preventing Water Damage: It helps prevent water from seeping into the roof deck in case the primary roofing material is damaged or compromised.
-
Acting as a Weather Barrier: Underlayment adds an extra layer of defense against extreme weather conditions like heavy rain, wind, and snow.
-
Increasing Roof Durability: It enhances the durability of the roof by protecting the roof deck from exposure to moisture and temperature fluctuations.
-
Building Code Compliance: In many regions, roof underlayment installation is a requirement by local building codes to ensure the safety and durability of homes.
Types of Roof Underlayment
Before diving into the installation process, it's essential to understand the different types of roof underlayment available on the market. The three primary types are:
1. Asphalt-Saturated Felt
This is the most traditional and commonly used type of roof underlayment. It’s made from organic or fiberglass mat soaked in asphalt to create a water-resistant material. Asphalt-saturated felt is typically available in two grades: 15-pound and 30-pound, with the latter offering more durability and resistance.
- Pros: Affordable, readily available, easy to install.
- Cons: Can wrinkle or tear over time, less resistant to UV rays and moisture compared to newer materials.
2. Synthetic Underlayment
Synthetic underlayment is made from polyethylene or polypropylene and has become a popular choice in modern roofing due to its superior performance. It’s lightweight, durable, and offers better resistance to water and UV rays than traditional felt.
- Pros: Lightweight, tear-resistant, UV-resistant, longer lifespan.
- Cons: More expensive than asphalt felt, but the cost is justified by its extended durability.
3. Rubberized Asphalt
Rubberized asphalt Synthetic Roofing Underlayment is the premium option, offering excellent waterproofing capabilities. It typically comes with a self-adhesive backing, making installation more manageable. Rubberized asphalt is ideal for areas prone to heavy rain or ice dams.
- Pros: Superior waterproofing, easy installation with self-adhesive, flexible.
- Cons: Expensive compared to other options, overkill for regions with mild weather.
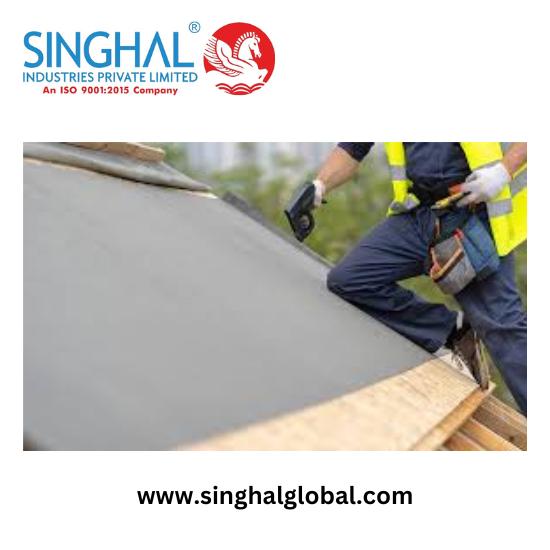
Roof Underlayment Installation: Step-by-Step Guide
Installing roof underlayment correctly is vital to ensure a secure and watertight roofing system. Here’s a step-by-step guide on how to install roof underlayment effectively:
Step 1: Prepare the Roof Deck
Before installing the underlayment, ensure the roof deck is clean, dry, and free of debris. Any dirt, moisture, or old nails could compromise the underlayment's performance. Inspect the deck for any damages or loose areas, and make necessary repairs.
Step 2: Choose the Right Underlayment
Based on your region's climate and roofing material, choose the appropriate type of underlayment. For example, if you live in an area with heavy rainfall, you may want to opt for synthetic or rubberized asphalt underlayment for better protection.
Step 3: Install Drip Edge (If Required)
In some cases, installing a drip edge is essential before laying down the underlayment. A drip edge is a metal flashing placed at the roof's edge to guide water away from the fascia and roof deck. Install the drip edge along the eaves before starting the underlayment process.
Step 4: Roll Out the Underlayment
Begin at the bottom edge of the roof and work your way upward. Roll out the underlayment horizontally, overlapping each row by at least 4 to 6 inches. Make sure the underlayment covers the entire roof deck, leaving no gaps. Overlapping prevents water from seeping through the seams.
- Pro Tip: For steep roofs, you may need to install battens or boards to prevent the underlayment from slipping during installation.
Step 5: Secure the Underlayment
Use roofing nails or staples to secure the underlayment to the roof deck. Space the fasteners about 12 to 24 inches apart along the edges of the underlayment and 36 inches apart in the middle. Be cautious not to overdrive the nails, as this can tear the underlayment.
Step 6: Seal Valleys and Edges
For areas where water flow is higher, such as valleys and roof edges, use additional layers of underlayment or opt for self-adhesive rubberized asphalt to provide extra protection. Ensure proper sealing around chimneys, vents, and skylights, as these areas are more prone to leaks.
Step 7: Install Flashing and Final Roofing Material
Once the underlayment is installed and securely fastened, proceed with installing any flashing or trim around edges, chimneys, and vents. Finally, install the primary roofing material (such as shingles, tiles, or metal sheets) according to manufacturer instructions.
Best Practices for Roof Underlayment Installation
-
Follow Manufacturer Guidelines: Always follow the specific guidelines provided by the underlayment manufacturer. Each product may have unique installation requirements.
-
Work During Clear Weather: Install roof underlayment during dry weather conditions. Moisture or rain during installation can compromise the adhesion and performance of the underlayment.
-
Proper Ventilation: Ensure that the roof deck has proper ventilation to prevent moisture buildup underneath the underlayment. Poor ventilation can lead to condensation, reducing the lifespan of the roofing system.
-
Hire a Professional: While DIY enthusiasts may be tempted to install roof underlayment themselves, it’s often best to hire a professional roofer, especially for larger or complex roofing projects.
Conclusion
Roof underlayment installation is a critical step in creating a durable and watertight roofing system. By choosing the right Waterproof Roofing Underlayment, following best installation practices, and ensuring proper overlap and sealing, you can protect your home from leaks, water damage, and extreme weather conditions. Whether you're working on a new roof or a renovation project, taking the time to install quality roof underlayment will pay off in the long term with fewer repairs and a longer-lasting roof.
For homeowners and contractors alike, understanding the importance of roof underlayment and its proper installation is key to a successful roofing project.
FAQs
1. Is roof underlayment necessary for all roofs?
Yes, roof underlayment is an essential component of any roofing system. It acts as a moisture barrier and adds extra protection against leaks, ensuring the roof’s durability.
2. Can I install roof underlayment myself?
While it is possible to install roof underlayment on your own, it’s recommended to hire a professional. Proper installation requires experience and knowledge of roofing techniques to ensure maximum performance.
3. How long does roof underlayment last?
The lifespan of roof underlayment depends on the material. Synthetic underlayment typically lasts 20-30 years, while asphalt felt may need replacement after 10-20 years. Rubberized asphalt underlayment can last even longer, especially in harsh climates.
4. Can roof underlayment be left exposed?
Roof underlayment is not designed to be left exposed for extended periods. While synthetic underlayment may last longer in direct sunlight, all types of underlayment should be covered with the primary roofing material as soon as possible to avoid UV damage and weathering.